Yes, in many cases they do. Accessible bathrooms are attractive for aging-in-place buyers and multi-generational families, making the home more marketable and future-ready.
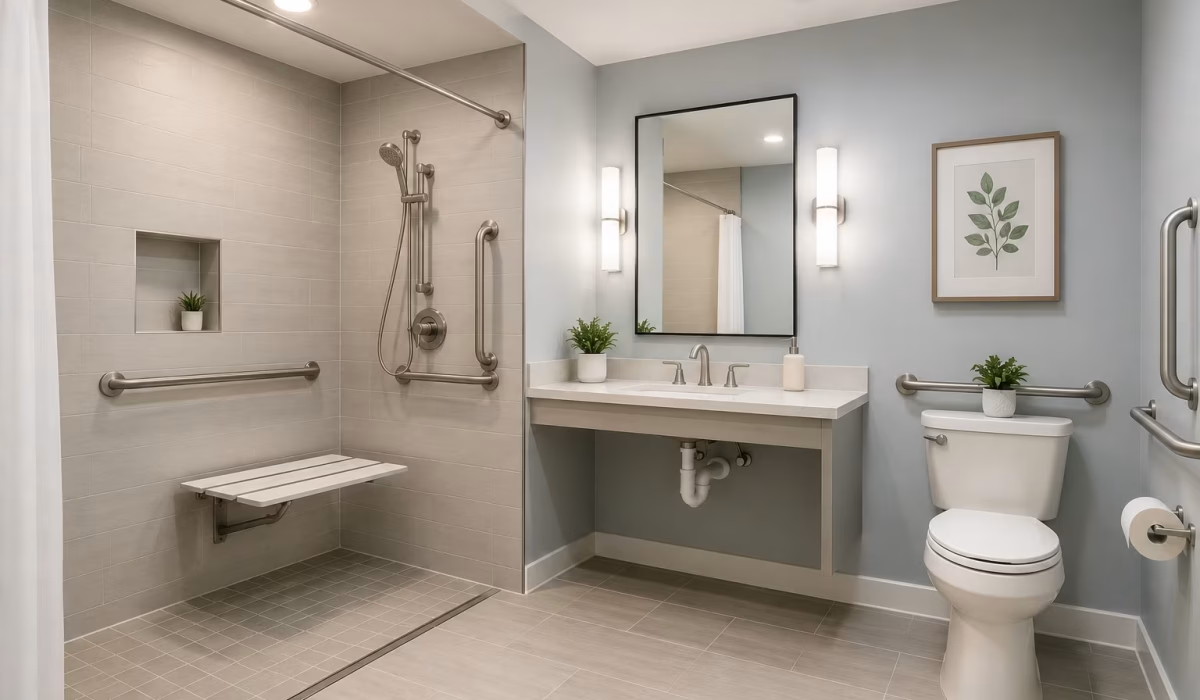
18 Wheelchair Accessible Bathroom Remodeling Tips & Ideas
Whether you're remodeling for yourself, a family member, or a future occupant, designing a wheelchair accessible bathroom is one of the most impactful home improvement projects you can undertake. An accessible bathroom isn't just about meeting minimum code requirements, it's about creating a space where independence, dignity, and comfort thrive without compromise.
Below are some practical wheelchair accessible bathroom remodeling tips and ideas to help you design a safer, more functional, and comfortable space. These tips focus on improving mobility, usability, and independence while ensuring the bathroom remains modern and easy to use for everyone.
Tip 1: Floor Space
The foundation of any wheelchair accessible bathroom is having enough floor space for safe, comfortable maneuvering. This is one of the most critical, and most overlooked, aspects of accessible design.
The ADA recommends a clear floor turning radius of at least 60 inches (5 feet) in diameter to allow a standard wheelchair to execute a full 360-degree turn without obstruction. If your current bathroom is too small to accommodate this, a wall removal or room expansion may be necessary before any other remodeling can meaningfully improve accessibility.
Beyond the turning radius, each fixture and space within the bathroom needs its own clear floor space:
Toilet: A minimum of 60 inches wide by 56 inches deep of clear floor space
Shower: At least a 36×36-inch roll-in shower, though 60×30 inches or larger is strongly preferred
Sink/Vanity: 30 inches wide by 48 inches deep of forward-approach clear floor space
Door clearance: 18 inches of maneuvering clearance on the pull side of any door.
If a full expansion isn't possible, strategic removal of unnecessary furniture, reconfiguring the layout, or sliding/pocket doors can dramatically increase usable floor space without adding square footage. In some cases, combining two smaller adjacent rooms or repurposing a closet can provide the necessary area.
Pro Tip: Before demolition begins, use blue painter's tape on your current floor to mock out the ADA-recommended clearances for each fixture. This simple visualization step can save thousands of dollars in redesign costs down the line.
Tip 2: Widen Doorways
Standard interior doorways are typically 28–30 inches wide, far too narrow for most wheelchairs and scooters, which require a minimum clear opening of 32 inches, with 36 inches being the gold standard for comfortable access.
Widening a doorway to 36 inches may seem like a minor structural change, but it makes an enormous practical difference. The process typically involves removing the existing door frame, trimming back the surrounding drywall, repositioning any electrical outlets or switches, and installing a new, wider door frame and door.
Door style options for accessible bathrooms include:
Pocket doors: Slide into the wall, eliminating the door swing entirely and maximizing usable floor space inside the bathroom. Ideal for tight layouts.
Barn/sliding doors: A stylish alternative to pocket doors, sliding along a wall-mounted rail. Easy to operate with one hand or from a wheelchair, though they don't seal as tightly as hinged doors.
Offset hinges: Can add 1.5–2 extra inches of clearance to an existing door without full reconstruction, a cost-effective option when full widening isn't feasible.
Swing-clear hinges: Similar to offset hinges, these allow the door to fold back completely flush with the wall, maximizing the opening width.
Cost Estimate: Doorway widening typically runs $300–$1,000 depending on whether load-bearing walls are involved. Pocket door installation averages $1,000–$3,500 including labor.
Tip 3: Roll-In Shower
The shower is often the most challenging area of the bathroom for wheelchair users, and it's also where the most transformative improvements can be made. The gold standard for wheelchair accessible showers is a roll-in shower, a curbless, barrier-free design with no threshold to cross.
Traditional shower stalls with lips or curbs, even those as low as 2 inches, create significant barriers for wheelchair entry. A roll-in shower eliminates this entirely, allowing a wheelchair user to simply roll directly in, or to transfer to a shower bench or chair with minimal physical effort.
Key dimensions for a roll-in shower:
Minimum size: 36×36 inches (functional but limited)
Recommended size: 36×60 inches or larger
Ideal size for attendant care: 60×60 inches or larger
The floor must slope gently toward the drain, typically a 1:48 ratio (¼ inch per foot), to allow water to drain without pooling. A linear drain along one wall is often easier to achieve with proper sloping than a center drain and creates a cleaner aesthetic.
Shower floor texture is critical. The surface must be slip-resistant but not so textured that it's difficult to roll or slide a wheelchair across. Pebble tile, large-format textured porcelain, or rubber-textured surfaces all perform well.
The shower should also include a fold-down or wall-mounted teak bench at 17–19 inches in height, matching the standard seat height of most wheelchairs to make transfers easier. Teak is moisture-resistant and warm to the touch, while stainless steel and PVC options are also durable.
Pro Tip: Consider a wet room design, where the entire bathroom floor is waterproofed and graded to drain, eliminating the shower enclosure entirely. Wet rooms are popular in European design and provide maximum flexibility for wheelchair use throughout the entire bathroom.
Tip 4: Toilet Height
Standard toilet seats sit at approximately 15–17 inches from the floor, which can be difficult or even impossible for wheelchair users to transfer onto comfortably. ADA-compliant toilets (also called "comfort height" or "chair height" toilets) sit at 17–19 inches from the floor, roughly the height of a standard wheelchair seat, making lateral transfers significantly easier.
Beyond seat height, toilet placement and surrounding clearances are equally important:
Side clearance: A minimum of 18 inches from the toilet centerline to the nearest side wall (60 inches total width is preferred for attendant-assisted transfers)
Front clearance: At least 48 inches of clear floor space in front of the toilet
Rear wall distance: The toilet should be positioned with the flush controls and paper holder within easy reach
Toilet styles for accessible bathrooms:
- Wall-hung toilets: Mounted directly to the wall with a concealed tank in the wall cavity. The seat height can be adjusted during installation (typically 15–19 inches), and the open floor space beneath makes cleaning easier and the room feels more spacious.
- Elongated bowl toilets: Provide a larger seating surface, making transfers more comfortable.
- Bidet toilet seats/smart toilets: Eliminate the need for twisting or reaching to use toilet paper, a significant benefit for users with limited upper body mobility or reach.
Grab bars near the toilet are non-negotiable (see Tip 8), and a toilet safety frame or three-in-one commode can be added over a standard toilet as a lower-cost interim solution.
Tip 5: Accessible Sink
A standard bathroom vanity cabinet sits at about 32–34 inches in height, with a solid cabinet base that prevents a wheelchair user from rolling underneath. For someone using a wheelchair, this means approaching the sink at an awkward angle, reaching over the cabinet, and straining the back and shoulders. ADA guidelines call for the sink to be mounted at a maximum height of 34 inches (measured to the rim), with knee clearance of at least 27 inches high, 30 inches wide, and 19 inches deep beneath the basin. This allows a wheelchair user to roll directly under the sink, sit upright, and access the faucet and basin comfortably.
Design considerations for an accessible sink:
- Wall-mounted/floating vanities: Offer the most flexibility, as the height can be precisely adjusted during installation and the knee clearance is fully open.
- Exposed-leg console sinks: A stylish alternative that provides knee clearance while maintaining a traditional vanity look.
- Under-sink insulation: The drain pipe and hot water supply lines beneath an open sink can burn bare legs. Always wrap pipes with foam insulation sleeves or install a pre-made under-sink cover kit.
- Lever faucets: Single-lever faucets or wrist-blade handles are far easier to operate than traditional round knob handles. Hands-free sensor faucets are an excellent premium option.
- Shallow basin depth: Opt for sinks with a maximum basin depth of 6½ inches to reduce reach distance.
A tilted or adjustable mirror above the sink ensures wheelchair users can see their reflection without craning their necks, and is a small but meaningful design detail often overlooked in accessible bathroom design.
Tip 6: Right Flooring
Flooring in an accessible bathroom must serve two competing needs: it must be slip-resistant to prevent falls, but also smooth enough that a wheelchair can roll across it without excessive friction or catching on grout lines and texture. Striking this balance requires careful material selection.
Best flooring options for wheelchair accessible bathrooms:
Luxury Vinyl Plank/Tile (LVP/LVT): Currently one of the most popular choices for accessible bathrooms. It's waterproof, soft underfoot, warm in temperature, low-maintenance, and available in a coefficient of friction (COF) rating that meets ADA slip-resistance requirements (minimum COF of 0.6 dry, 0.4 wet). The smooth, even surface is ideal for wheelchair rolling.
Large-Format Porcelain Tile (12×24 inches or larger): Fewer grout lines mean fewer obstacles for wheelchair wheels. Choose tiles with a matte or textured surface rated for wet areas. Ensure the grout joints are filled flush with the tile surface.
Rubber Flooring: Commercial-grade rubber flooring offers excellent slip resistance and is one of the smoothest surfaces for wheelchair rolling. It's durable, water-resistant, and easier on joints than ceramic tile. Available in sheet or interlocking tile formats.
Avoid:
- Small mosaic tiles with many grout lines (create resistance and vibration)
- High-gloss tiles (dangerously slippery when wet)
- Thick, plush bath mats (wheel-catching hazards, use thin, non-slip bath mats instead)
- Transitions and thresholds between rooms (use flush transitions or eliminate them entirely)
Color contrast is another important flooring consideration. High contrast between the floor and the walls, and between the floor and the toilet/shower base, helps individuals with low vision navigate the space safely.
Tip 7: Grab Bars
Grab bars are arguably the single most impactful safety feature in any accessible bathroom, and they're one of the most underutilized. Many homeowners delay installing grab bars because they associate them with a clinical, institutional look, but modern grab bars are available in beautiful finishes (brushed nickel, matte black, polished chrome, bronze) and elegant profiles that blend seamlessly with any bathroom design aesthetic.
Where to install grab bars:
At the toilet:
- One horizontal bar on the side wall at 33–36 inches above the floor, 6 inches in front of the toilet
- One horizontal or angled bar on the rear wall
- A swing-down grab bar on the open side (for bilateral support) if space allows
In the shower:
- One horizontal bar on the side wall at 33–36 inches for seated transfers
- One vertical bar near the entry for standing assistance
- An L-shaped bar (combining horizontal and vertical) provides maximum flexibility
At the bathtub (if retained):
- Horizontal bar along the long wall at 33–36 inches
- Vertical bar on the control wall for entering and exiting
General installation rules:
- Grab bars must be mounted into wall studs or blocking, never into drywall alone
- ADA-compliant bars must support a minimum of 250 lbs of force
- Bar diameter should be 1¼–1½ inches for an optimal grip
- There should be 1½ inches of clearance between the bar and the wall
If studs aren't in the right position, install solid wood blocking (¾-inch plywood) behind the drywall during the remodel, this allows grab bars to be added or relocated anywhere along the blocked area in the future without opening up the walls again.
Aesthetic tip: Match grab bar finish to your faucet and towel bar hardware for a cohesive, intentional look rather than an afterthought.
Tip 8: Shower Seat
A well-designed shower seat transforms the showering experience for wheelchair users, individuals with limited stamina, and anyone recovering from surgery or injury. Unlike portable shower chairs that can be unstable on wet floors, a properly installed fold-down shower bench is fixed, stable, and space-efficient.
Types of shower seats:
Fold-down wall-mounted bench: The most space-efficient option. When folded up against the wall, it frees the entire shower floor for wheelchair maneuvering or standing use by other household members. Teak wood fold-down benches are a popular, aesthetically warm choice; stainless steel and PVC versions are also durable.
Built-in corner bench: Tiled to match the shower walls, a built-in L-shaped or corner bench creates a permanent, seamless seat. Less flexible than fold-down options but very sturdy and visually integrated.
Transfer bench: Extends outside the shower opening, allowing a wheelchair user to slide from the wheelchair onto the bench, then slide laterally into the shower without needing to stand. Particularly useful for users who cannot bear weight.
Seat height and dimensions:
- Seat height: 17–19 inches from the shower floor
- Seat depth: at least 15 inches
- Seat width: at least 24 inches for fold-down; 24×24 inches for built-in corner bench
Position the seat adjacent to a grab bar and the shower controls to minimize reaching.
Tip 9: Shower Controls
In a conventional shower, controls are often mounted in the center of the back wall at a height suited for standing use, typically around 48–60 inches. For a seated shower user, this can require uncomfortable reaching across the spray zone to adjust temperature or flow, creating both a safety hazard and a practical frustration. ADA guidelines recommend shower controls be mounted no higher than 48 inches from the floor when approached from a side reach, and no higher than 44 inches for a front reach. For seated users, a mounting height of 38–48 inches is typically most comfortable.
Best practices for shower control placement:
- Mount controls on the side wall adjacent to the bench, not on the back wall behind the spray
- This allows the user to adjust water temperature and flow before entering the spray zone, critically important for preventing scalding
- A pressure-balancing or thermostatic valve with anti-scald protection is essential; it maintains a consistent temperature regardless of pressure fluctuations from other fixtures in the home
- Lever-style or large-paddle handles are far easier to operate than small round knobs, especially for users with limited grip strength or dexterity
- Digital shower systems (such as those from Kohler or Moen) allow pre-setting of preferred temperature and can be activated by a remote button near the shower entry, a premium but excellent accessibility upgrade
A handheld shower head on an adjustable slide bar (see Tip 10) completes the accessible shower setup.
Tip 10: Handheld Showerhead
A handheld showerhead on a vertical slide bar is one of the most universally useful accessibility upgrades in any bathroom. For wheelchair users and seated bathers, it allows complete control over water direction without needing to move under a fixed overhead stream.
Features to look for:
- Hose length: A minimum of 59 inches; 72-inch hoses provide maximum flexibility for use from a shower seat or wheelchair
- Slide bar range: The bar should span from approximately 28 inches to 72 inches in height, with a secure locking mechanism to hold the head at any position
- Pause function: A pause or flow-reduction button on the showerhead allows users to conserve water while soaping up without adjusting the main valve
- Spray settings: Multiple spray settings (rain, massage, mist) are a comfort upgrade worth considering
- Magnetic docking: Some premium models (like the Moen Magnetix line) use magnetic docking to make it easy to replace the handset in the holder one-handed
The slide bar itself should be mounted securely into wall studs or blocking, it can double as a light-duty grab bar for balance, though it should not be relied upon as a primary grab bar (those require dedicated structural mounting).
Cost range: Basic handheld showerhead with slide bar: $50–$150. Premium thermostatic systems with multiple outlets: $500–$2,000+.
Tip 11: Electrical Placement
Accessibility isn't only about the big fixtures, the small details of electrical placement can have a meaningful daily impact. Standard light switches are mounted at 48 inches, and standard outlets are placed at 12–18 inches. For wheelchair users, both can be awkward or unreachable.
ADA recommendations for accessible electrical placement:
- Light switches and controls: 15–48 inches from the floor (with 44–48 inches being most accessible for forward reach from a wheelchair).
- Electrical outlets: 15–48 inches from the floor (raising outlets to 18–24 inches makes them far easier to access without bending).
- GFCI outlets (ground fault circuit interrupter) are required near water sources regardless of accessibility needs.
- Rocker-style switches: Easier to operate than traditional toggle switches, especially for users with limited hand dexterity.
- Illuminated or glow-in-the-dark switches: Improve visibility for users with low vision.
Smart home integration can eliminate the need for physical switches entirely through voice control or smartphone automation, a significant upgrade for users with severe mobility limitations.
Tip 12: Vanity Storage
In a traditional bathroom with a standard vanity cabinet, most storage is beneath the countertop, inaccessible to a seated wheelchair user who needs knee clearance. Rethinking bathroom storage as part of an accessible remodel ensures that daily-use items are within reach without requiring awkward stretching or assistance.
Accessible storage strategies:
Wall-mounted cabinets: Install at heights reachable from a seated position, the optimal zone is between 15 and 48 inches above the floor. Avoid overhead cabinets entirely, or limit them to items rarely needed.
Open shelving: Eliminates the need to operate cabinet doors. Floating shelves within the 15–48-inch reach zone are practical and can look sleek and modern.
Pull-out drawers: Full-extension, soft-close drawers are far more accessible than deep interior shelves, bringing contents to the user rather than requiring reaching into a dark cabinet interior.
D-ring or large loop pulls: These hardware choices are far easier to operate than small knobs for users with limited grip strength.
Lazy Susan or turntable organizers: Useful inside any cabinet to bring items forward with a simple rotation.
Countertop organization: Keep frequently used items (soap, toothbrush, medications) on the counter within easy reach rather than in cabinets.
Medicine cabinet height: If a recessed medicine cabinet is included, mount it so the upper shelves are no higher than 44 inches, or opt for a full-length mirror instead.
Tip 13: Walk-In Tub
While roll-in showers are often the primary bathing solution in accessible bathrooms, some users strongly prefer soaking in a bathtub. For these individuals, there are several accessible bathtub options that balance safety with comfort.
Walk-in tubs: Feature a watertight door in the side of the tub that allows entry without stepping over a high tub wall. The user enters, closes the door, and fills the tub. Walk-in tubs are popular among older adults and are available with therapeutic features like air jets, chromotherapy, and quick-fill/drain systems. However, they have a significant limitation: the user must enter before filling and remain in the tub while it drains, a cold waiting period some find uncomfortable.
Low-threshold tubs: Have a reduced step-in height (as low as 3–4 inches versus the standard 14–16 inches), making them safer and easier to step into for ambulatory users with limited mobility.
Tub transfer benches: A bench that spans the side of a standard tub, allowing a wheelchair user to slide onto the bench and then slide laterally into the tub while seated. Paired with a handheld showerhead, this setup can allow bathing in a conventional tub without full immersion.
Roll-in tubs: A newer category of accessibility-focused tubs with a door that opens when the tub is empty, a fold-down seat, and integrated grab bars. These offer the soaking experience with wheelchair-accessible entry.
For most full accessible bathroom remodels, the roll-in shower is the primary focus and a walk-in tub is an optional addition if space and budget allow.
Tip 14: Lever Hardware
Hardware choices throughout the bathroom may seem minor, but they collectively represent dozens of daily interactions, and the difference between a knob and a lever is the difference between a grip-and-twist motion and a simple downward press.
Lever door handles can be operated with a closed fist, an elbow, or even the back of a hand, critical for users with arthritis, limited grip strength, or paralysis. ADA guidelines require lever-style handles on all accessible door hardware.
Loop or D-ring cabinet pulls serve the same function for drawers and cabinet doors. A finger slipped through a loop requires far less grip than pinching a knob or small bar pull.
Faucet hardware: Opt for single-lever mixing faucets, wrist-blade handles, or touchless/sensor faucets. Multi-handle faucets that require simultaneous operation of hot and cold handles separately are very difficult for users with limited hand function.
Flush handles: ADA-compliant toilets should have flush controls on the open (approach) side of the toilet. Push-button flush mechanisms, sensor flushers, or foot-pedal flush systems can eliminate hand operation entirely.
All accessible hardware should be operable with one hand and without tight grasping, pinching, or twisting of the wrist.
Tip 15: Better Lighting
Proper lighting is an often-underestimated component of bathroom safety and accessibility. Poor lighting contributes to falls, makes it difficult to identify fixtures and controls, and can create a disorienting environment for users with low vision.
Accessible bathroom lighting best practices:
Maximize natural light: Where possible, add or enlarge windows to bring in natural light. Frosted or privacy glass maintains modesty while maximizing brightness.
Layered artificial lighting: Use a combination of ambient (overhead), task (vanity and mirror), and accent lighting to eliminate shadows and dark corners.
Night lighting: Install low-level LED night lights or illuminated switch plates so the bathroom can be safely navigated in the middle of the night without turning on bright overhead lights that can be disorienting.
Avoid high-glare surfaces: While brightness is important, glare from shiny tile, mirrors, or chrome fixtures can be problematic for users with visual impairments. Use matte finishes where possible.
Occupancy sensors: Motion-activated lights that turn on automatically when someone enters the bathroom eliminate the need to locate and operate a light switch in the dark.
Color temperature: Choose lighting in the 3,000–4,000 Kelvin range (warm white to neutral white) rather than harsh cool white (5,000+ K), which can be uncomfortable for sensitive eyes.
Color contrast lighting: Ensure that light is distributed evenly across the floor, especially at the transition between the shower and the main bathroom floor, to help users with low vision identify changes in surface level.
Tip 16: Accessible Mirror
A standard bathroom mirror is typically mounted with its bottom edge at approximately 40 inches above the floor, a height that places the reflection of a seated wheelchair user at chest level rather than face level. An accessible mirror should have its bottom edge no higher than 35–38 inches, allowing a person seated in a wheelchair to see their face clearly. Many accessible bathroom designs opt for a full-length mirror that works for both seated and standing users, mounted so the bottom edge is no higher than 35 inches. Tilt-down mirrors are another excellent option, these are hinged at the top and can be angled downward to direct the reflection toward a seated user. The angle can be adjusted to account for different users and wheelchair heights. Illuminated mirrors and lighted vanity mirrors with integrated LED lighting provide excellent facial lighting for grooming tasks. Backlit mirrors are stylish and reduce the need for separate light fixtures around the mirror. For multi-user households, an adjustable-height mirror on a wall-mounted track allows the mirror position to be changed between seated and standing users quickly.
Tip 17: Towel Bars
The placement of everyday bathroom accessories, towel bars, toilet paper holders, soap dispensers, and hooks, may seem trivial, but for wheelchair users, an awkwardly positioned towel bar or paper holder can turn a routine daily task into a frustrating challenge.
ADA-recommended placement for bathroom accessories:
- Towel bars: 33–48 inches above the floor; position at least one within reach from a seated position at the vanity and from the shower bench
- Toilet paper holder: 7–9 inches in front of the toilet, 19 inches above the floor, close enough to reach without twisting or shifting
- Soap dispensers: Countertop pump dispensers are easiest; wall-mounted versions should be within the 15–48-inch reach zone
- Robe hooks: 48 inches maximum; consider adding a second hook at a lower height (36–40 inches) for wheelchair-height access
- Grab bars that double as towel bars: A number of manufacturers now produce grab bars with a towel ring or bar integrated into the design, combining function without cluttering the walls
Every accessory should be operable without tight grasping or pinching. Lever-style paper holders and pump soap dispensers are preferred over small knob-style dispensers.
Tip 18: Smart Technology
Modern smart home technology has opened extraordinary new frontiers in bathroom accessibility, enabling users with severe mobility limitations to control virtually every aspect of their bathroom environment through voice commands, smartphone apps, or single-button smart controls.
Smart technology upgrades for accessible bathrooms:
Voice-activated controls (Amazon Alexa, Google Home, Apple HomeKit): Integrate with smart light switches, smart thermostats, and smart bathroom fans to allow hands-free control of the entire environment. "Alexa, turn on the bathroom light" is transformative for users who cannot easily reach or operate physical switches.
Smart shower systems: Brands like Kohler (Konnect), Moen (U by Moen), and GROHE (SmartControl) offer digital shower systems that can be programmed with personalized temperature and flow presets, activated remotely via smartphone before entering the bathroom, and controlled by large, easy-to-press digital interfaces. Some integrate directly with voice assistants.
Smart toilet seats and bidets: TOTO, Kohler, and Brondell offer bidet toilet seats with heated seats, warm water washing, and air drying, eliminating the need for toilet paper use entirely, which is significant for users with limited arm reach or mobility.
Automated door openers: Motorized door operators (similar to those used on commercial accessible entrances) can be retrofitted to residential bathroom doors, allowing a user to open and close the door with a push button or remote control, particularly useful for power wheelchair users.
Emergency call systems: Install a waterproof emergency pull cord or push button (similar to those used in hospitals) within reach of the shower and toilet. These can be connected to a home monitoring system, a caregiver's phone, or a medical alert service, providing critical backup in the event of a fall or medical emergency.
Smart faucets and water management: Sensor-activated or voice-controlled faucets eliminate the need to operate handles, and smart water heaters with precise temperature control add a layer of safety and comfort.
Automatic lighting with occupancy sensors: Lights that activate automatically on entry and deactivate on exit simplify the experience and eliminate one more manual task in the daily routine.
The investment in smart technology need not happen all at once, a smart home-compatible electrical setup (neutral wire in switches, smart home hub) can be installed during the remodel, with smart devices added incrementally over time.
Why Wheelchair Accessible Bathroom Remodeling Matters?
According to the U.S. Centers for Disease Control and Prevention (CDC), approximately 61 million adults in the United States live with a disability, and mobility-related disabilities are among the most common. Bathrooms are statistically one of the most hazardous rooms in any home, slippery surfaces, narrow doorways, and poorly placed fixtures create serious risks for wheelchair users and individuals with limited mobility. A well-executed accessible bathroom remodel does far more than prevent accidents. It restores independence, reduces caregiver burden, increases a home's resale value, and dramatically improves quality of life. Under the Americans with Disabilities Act (ADA), commercial and public facilities must meet specific accessibility standards, and while private residences aren't legally required to comply, these ADA guidelines serve as an excellent benchmark for any accessible home remodel. With thoughtful planning and the right professional team, an accessible bathroom can be just as beautiful and inviting as any other, and often more functional for everyone in the household.
Why Choose Splash Home Remodeling for Wheelchair Accessible Bathroom Remodeling in Richardson, TX?
Choosing Splash Home Remodeling for wheelchair accessible bathroom remodeling in Richardson, TX means working with a team that understands both functionality and comfort. We focus on creating bathrooms that are not only code-compliant but also thoughtfully designed for real-life mobility needs. From wider clearances and barrier-free showers to properly placed grab bars and slip-resistant flooring, every detail is planned to support safety, independence, and ease of use. Our approach is fully customized to each homeowner’s needs, whether it’s for aging in place, disability access, or future-proofing a property. We combine practical design with quality craftsmanship to ensure long-lasting results that improve daily living. With Splash Home Remodeling, you get a space that feels modern, accessible, and built to make everyday routines simpler and more secure.
FAQS
Do wheelchair accessible bathrooms increase home value?
What is the difference between ADA compliant and accessible design?
ADA compliance follows specific legal standards, often used in public or commercial spaces. Accessible design in homes is more flexible and focuses on comfort, usability, and individual needs rather than strict regulations.
Do I need permits for accessible bathroom remodeling?
Yes, in most cases permits are required, especially if plumbing, electrical, or structural changes are involved. A professional contractor usually handles this process.
Can accessibility features be stylish as well?
Yes. Modern accessible bathrooms combine safety with design by using sleek grab bars, elegant fixtures, and contemporary finishes that blend smoothly with the overall look.
Can Splash Home Remodeling design bathrooms for multiple users with different mobility needs?
Yes, designs can be customized for households with varying needs, ensuring accessibility for wheelchair users, elderly individuals, and other family members.
Every successful renovation begins with a vision and ends with a space designed for better living.
Richardson, TX Remodeling Specialists
Posted in
Blogs


Related Posts



Prev
Next
×
 Call Now